Caching in Next.js: Simplified
Caching can sound scary — like something only massive tech companies care about — but in Next.js, it’s actually built right in. It’s what makes your pages feel buttery smooth and your servers breathe a sigh of relief.

⚡ Next.js Caching Explained (Without the Headache)
Caching can sound complicated — like something only big tech companies bother with — but in Next.js, it’s actually baked right in. It’s what makes your pages load faster, your servers chill out, and your visitors stay happy.
Let’s walk through how caching works in the Next.js App Router — in plain English.
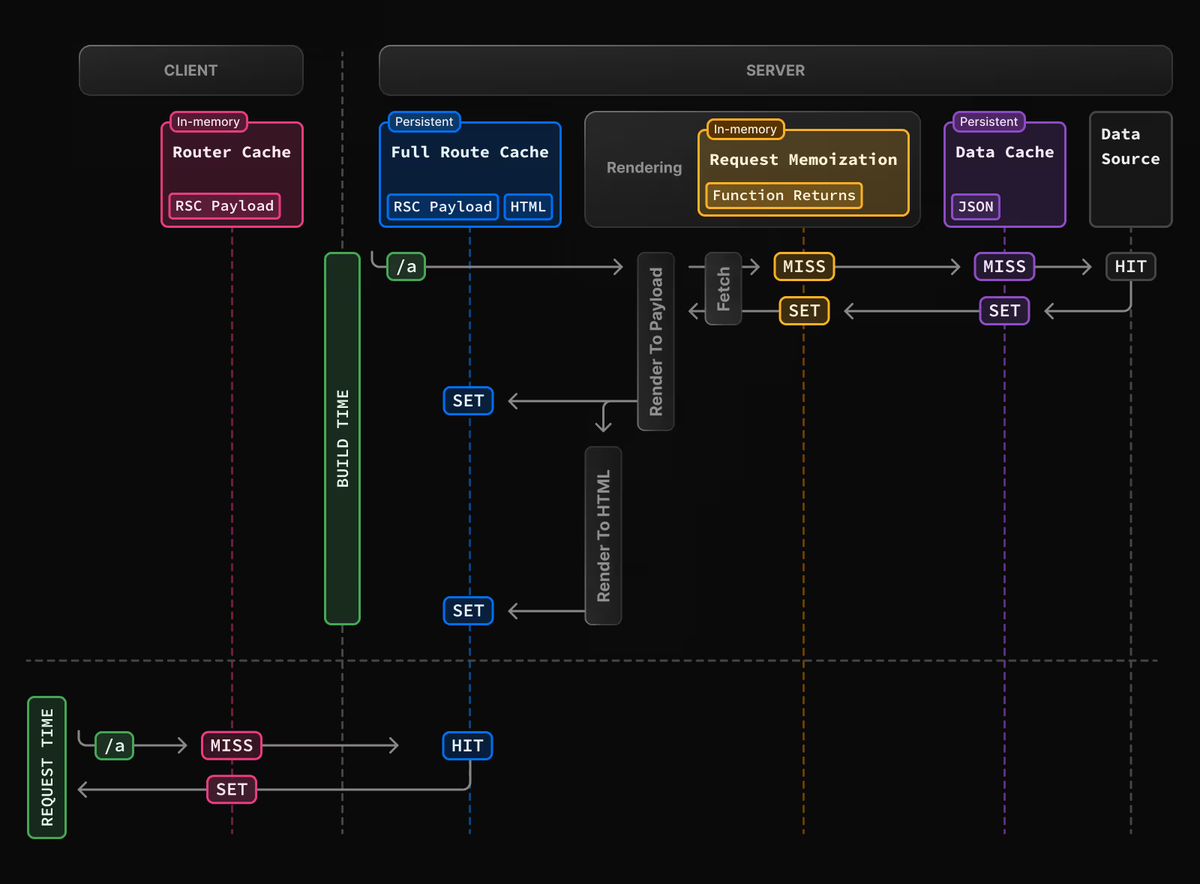
🧱 The Four Layers of Caching in Next.js
Next.js doesn’t just have one big “cache.” It actually uses four layers, each with its own job:
- Request Memoization – Think of this as short-term memory. It remembers identical
fetch()calls during a single render so the same data isn’t fetched twice. Once the render ends, this memory is wiped clean. - Data Cache – This is your app’s long-term memory. It stores results of GET requests so multiple users can share the same cached data. It stays cached until you revalidate it manually or automatically.
- Full Route Cache – This one stores the actual rendered page — the HTML and all server components. So the next time someone visits the same route, the server can skip re-rendering everything. It resets when you redeploy or when the data changes.
- Router Cache – This lives in the user’s browser. It keeps recently visited pages in memory so moving between them feels instant. It’s cleared when the browser refreshes or after some time.
🧠 Request Memoization — “Don’t Fetch Twice”
Imagine you call fetch() multiple times inside one render, using the same URL and options. Normally, that’d mean multiple network trips. But Next.js is clever — it memoizes the result and reuses it.
So instead of fetching data three times, it fetches once and shares the result. Once rendering is done, that memory is cleared. It’s temporary, but super handy for performance.
💾 Data Cache — “Your App’s Long-Term Memory”
The Data Cache is where Next.js stores data across requests. When one user triggers a fetch() for a particular endpoint, that result is saved and reused for others — making everything faster and cheaper.
You control how it behaves:
- To always use the cached data, you can write:
fetch(url, { cache: 'force-cache' })
- To refresh it every few seconds, use:
fetch(url, { next: { revalidate: 60 } }) // refresh every 60 seconds
- To manually revalidate, use server utilities like:
revalidatePath('/posts')
- or
revalidateTag('blog')
- And if you want no caching at all, simply do:
fetch(url, { cache: 'no-store' })

🏗️ Full Route Cache — “Rendering, but Make It Fast”
This cache stores the result of a fully rendered page — both HTML and server component payloads.
When someone visits a page, Next.js can serve the cached version instantly instead of re-rendering it from scratch. It’s like having a ready-to-go version of your page waiting on the server.
You can turn it off for dynamic pages by adding:
export const dynamic = 'force-dynamic'
or
export const revalidate = 0
It’ll also reset automatically if you redeploy or revalidate data.
🧭 Router Cache — “Speedy Navigation for Free”
This one’s all about the browser experience. When you visit a route, Next.js quietly keeps that route’s React payload in memory. So when you go back or forward, the navigation feels instant — no loading spinners or refetches.
It’s cleared automatically when the page is refreshed or after some time, and you can manually refresh it with:
router.refresh()
This gives your app the feel of a smooth single-page application (SPA), even though it’s still server-rendered.
🔄 How It All Works Together
Here’s the magic combo:
- Request Memoization prevents duplicate fetches within a single render.
- Data Cache saves fetched results across users and requests.
- Full Route Cache keeps rendered HTML ready to go.
- Router Cache makes client-side navigation instant.
When something changes — say, a new blog post is published — you can trigger revalidatePath() or revalidateTag(). That clears the old data and cached pages, ensuring everyone sees the latest content.
Meanwhile, the router cache in the browser updates automatically the next time users navigate, keeping everything in sync and snappy.
🧩 Handy Quick Guide
Here’s a few caching tricks you’ll actually use:
- Disable caching completely:
fetch(..., { cache: 'no-store' }) - Cache data forever:
fetch(..., { cache: 'force-cache' }) - Revalidate every 60 seconds:
fetch(..., { next: { revalidate: 60 } }) - Manually revalidate a route:
revalidatePath('/page') - Manually revalidate using tags:
revalidateTag('tag-name') - Force a fresh render:
export const revalidate = 0 - Refresh browser cache:
router.refresh()
✨ Conclusion
Next.js caching is automatic, layered, and powerful — you don’t have to do much to benefit from it.
Here’s what happens under the hood:
- It remembers fetches within a render.
- It stores data across requests.
- It caches pages for fast responses.
- And it speeds up navigation in the browser.
Most of it “just works,” but you can take control anytime with revalidation and caching options.
So yeah — your app gets lightning-fast performance, and you barely have to lift a finger.


